- Published on
Adding OIDC Authentication to OpenVPN Community Server
- Authors
- Name
- Jay


When you have many internal tools that require login, managing users and roles individually across separate systems can become a real headache. Fortunately, there’s an excellent open-source project called Keycloak. I prefer to integrate all internal tools with Keycloak to centralize authentication and authorization management. That’s why I also wanted to integrate OpenVPN with Keycloak.
There are two main editions of OpenVPN: the open-source Community Edition, and the enterprise-grade OpenVPN Access Server. Naturally, the enterprise edition offers robust features and can significantly reduce the effort needed to run a secure VPN server. It likely includes built-in support for integrating with Keycloak, making it a convenient choice.
If you’re deploying a self-hosted VPN server in a corporate environment, the enterprise edition can be a smarter decision—it saves time, allowing you to focus on tasks that contribute directly to your business’s core value. However, if you don’t need any advanced features, running the Community Edition on your server is a perfectly reasonable option.
Setting up a self-hosted VPN and integrating it with Keycloak wasn’t an urgent or critical task for me. Out of curiosity, I began exploring whether the OpenVPN Community Edition could meet my requirements during my spare time. Honestly, if this had been a necessity at a company, I would have chosen the enterprise edition to save time and effort—well worth the cost.
Authentication
One of my requirements was to integrate Keycloak for authentication. Thanks to two great open-source projects, I was able to understand how OpenVPN can support authentication via the OAuth2 protocol:
- An example using Go(https://github.com/jkroepke/openvpn-auth-oauth2)
- An example using Python(https://github.com/thesparklabs/openvpn-okta-sso-example)
Let me explain how this works. You should think of it in two parts: the client side and the server side.
On the client side, there’s OpenVPN Connect, which is the client application used to access the VPN server. When you try to connect to the OpenVPN server using OpenVPN Connect, the server requests that you authenticate via OAuth2 (in our case, through Keycloak). OpenVPN Connect then opens the Keycloak login page in your browser. You enter your Keycloak username and password, and upon successful login, you’re authenticated and the VPN connection is established.
A More Detailed Step-by-Step Explanation
Here’s a more detailed breakdown of what happens:
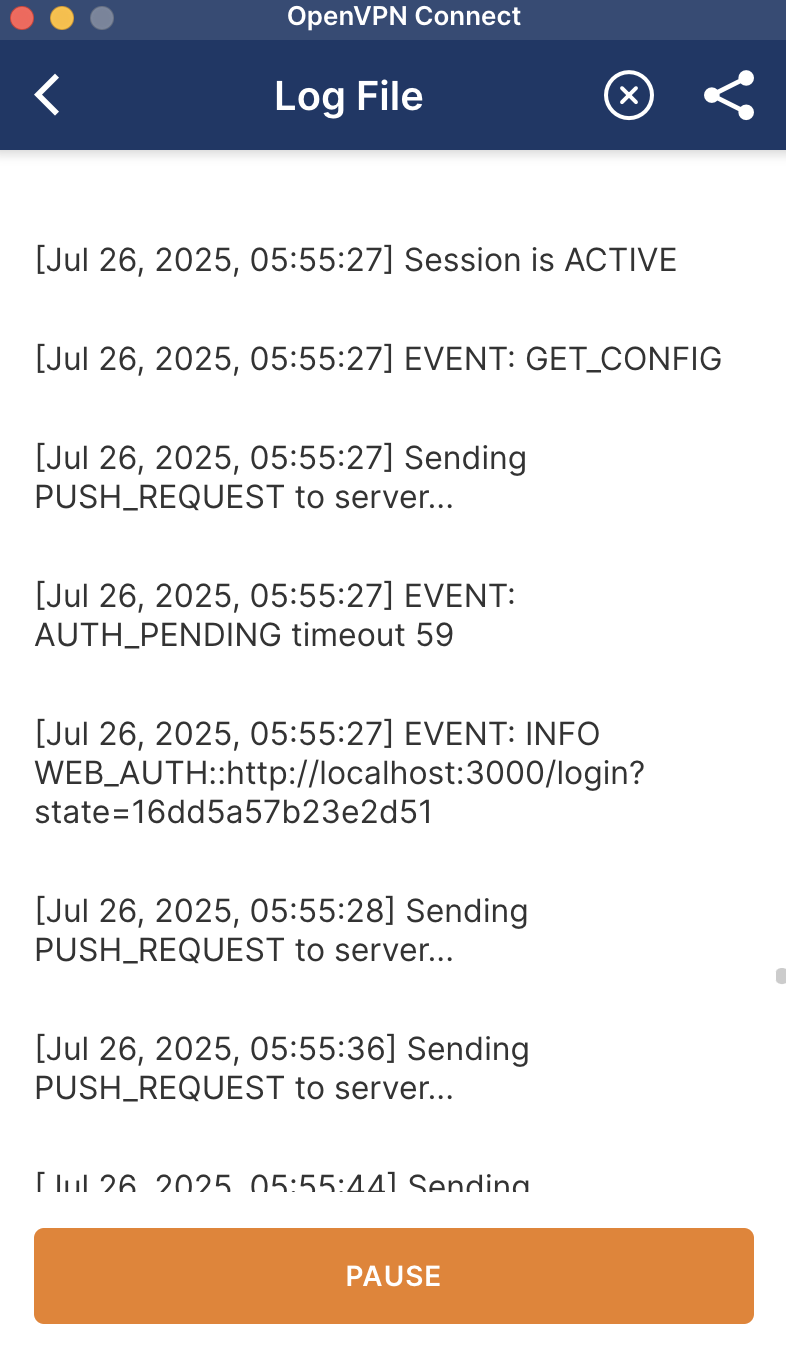
- OpenVPN Connect receives a message from the server that includes a URL for the login page. For example, the server might send:
client-pending-auth 1 1 WEB_AUTH::http://localhost:3000/login?state=16dd5a57b23e2d51 120
- This tells OpenVPN Connect to open http://localhost:3000/login in your browser.
- You can see this process in action by checking the OpenVPN Connect logs. It first logs an AUTH_PENDING event, followed by the WEB_AUTH event, which includes the URL that the browser should open.
- Once you see the Keycloak login page in your browser, you enter your credentials. After a successful login, Keycloak redirects to a callback URL you configured in your Keycloak client using OIDC.
Now you might ask: “Callback to where?”
Good question. This callback doesn’t go to the OpenVPN server directly. Instead, you need to run a separate server—let’s call it the Node.js server—to handle the callback from Keycloak. Later, I’ll share some Node.js code to make this clearer.
The Node.js server receives the callback from Keycloak, verifies the authentication result, and determines whether the user should be allowed to connect to the OpenVPN server.
At this point, you should understand that your system has two servers running:
- The OpenVPN server
- The Node.js server (handling the OAuth2 flow)
The client is trying to connect to the OpenVPN server, but the authentication result is handled by the Node.js server. So how do you let the OpenVPN server know that the user has been successfully authenticated?
This is where the OpenVPN Management Interface comes into play.
Once the Node.js server confirms that the user has successfully authenticated via OIDC, it uses the management interface to notify the OpenVPN server, which then allows the VPN connection to proceed. The Node.js server and the OpenVPN server exchange messages through this management interface using a simple protocol.
The OpenVPN Management interface allows OpenVPN to be administratively controlled from an external program via a TCP or unix domain socket.
The extra server(In our case, Nodejs application) handles the callback request from Keycloak and checks whether it is valid. It then sends a message to the OpenVPN server—either to allow or deny the client—via the management interface.
The OpenVPN server receives the message from the extra server and processes it accordingly.
The client sees whether the connection has been successfully established or denied in the OpenVPN Connect client application.
An example of the messages exchanged through the management interface.
Let’s take a look at the messages exchanged between the Node.js server and the OpenVPN server during a newly established connection:
OpenVPN Server → Node.js Server:
“Hey Node.js! A client is trying to establish a new connection.”>CLIENT:CONNECT,0,1\Node.js Server → OpenVPN Server:
“Oh really? Could you ask the client to authenticate using this URL?”client-pending-auth 0 1 WEB_AUTH::http://localhost:3000/login?state=16dd5a57b23e2d51 120\Node.js Server → OpenVPN Server:
“I received a valid callback request from Keycloak. The user is authenticated. You can proceed with the connection.”client-auth 0 1OpenVPN Server → Node.js Server:
“The connection has been successfully established. Thank you for your cooperation!”>CLIENT:ESTABLISHED,0
Reauthentication
Previously, we looked at how authentication works when establishing the initial connection. For Forward Secrecy, the OpenVPN server renegotiates the TLS session and encryption keys at regular intervals. By default, this renegotiation happens every 60 minutes.
The two references I mentioned earlier take different approaches to handling reauthentication when OpenVPN is configured to authenticate via the management interface using OIDC:
- An example using Go(https://github.com/jkroepke/openvpn-auth-oauth2)
- An example using Python(https://github.com/thesparklabs/openvpn-okta-sso-example)
Approach 1: Go Example
The Go example takes a simple approach. OpenVPN controls how often renegotiation occurs using the reneg-sec option, which can be configured on both the client and server sides. The server pushes a configuration to the client to disable renegotiation entirely by setting reneg-sec to 0:
server.conf
push "reneg-sec 0"
This prevents reauthentication from happening during an active session.
Approach 2: Python Example
The Python example allows renegotiation but uses additional configuration.
To understand this better, consider the following scenario:
Suppose you’ve configured two-factor authentication (2FA) for accessing your OpenVPN server. During the initial connection, users provide both their username/password and a TOTP code. After one hour, OpenVPN initiates a session renegotiation. However, you don’t want users to re-enter all their credentials just to maintain the connection.
In this case, you can use authentication tokens. By enabling the auth-gen-token option on the OpenVPN server, it generates an authentication token after the initial connection is established and pushes it to the client (OpenVPN Connect). The client stores this token and reuses it during renegotiation. If the server accepts the token, the session continues without prompting the user to re-enter credentials.
However, in this specific case, the authentication token isn’t validated in the usual way—because authentication is done via OIDC, not username/password. When auth-user-pass-verify is used and a user logs in with a valid username and password, OpenVPN generates a token bound to that username. In the OIDC-based flow, auth-user-pass-optional is set, and the username is left empty. Therefore, authentication token validation fails.
That’s why the second example configures auth-gen-token with external-auth. The external-auth option allows an external server (in our case, the Node.js server) to decide whether to allow or deny reauthentication during session renegotiation.
auth-gen-token 0 external-auth
In our case, even though the authentication token fails validation due to an empty username, the external server still receives a REAUTH event through the OpenVPN management interface:
>CLIENT:REAUTH,1,3
>CLIENT:ENV,session_id=QRGqJyAu801FWKZx
>CLIENT:ENV,session_status=AuthenticatedEmptyUser
Pay close attention to the session_status value. When it is set to AuthenticatedEmptyUser, it indicates that the server attempted to validate the token but failed because the username was empty. According to the OpenVPN documentation:
AuthenticatedEmptyUser / ExpiredEmptyUser: The token is not valid with the username sent from the client but would be valid (or expired) if we assume an empty username was used instead. These two cases are a workaround for behaviour in OpenVPN 3. If this workaround is not needed these two cases should be handled in the same way as Invalid.
In the second example, the session_id is stored during the initial connection and later validated by simply comparing it to the session_id provided during renegotiation. It also checks whether the session_state is AuthenticatedEmptyUser.
def clientReauth(self, cid, kid):
    if not cid in self.sessions or not "SessionID" in self.sessions[cid] or not "session_id" in self.clientData:
        return
    if self.sessions[cid]["SessionID"] != self.clientData["session_id"]:
        return
    # OpenVPN does not allow auth-gen-token without a username by default, so we allow it here
    if self.clientData["session_state"] in ["Authenticated", "AuthenticatedEmptyUser"]:
        reply = "client-auth-nt %s %s\n" % (cid, kid)
        self.conn.write(reply.encode())
    return