- Published on
aws-ebs-csi-driver 코드로 csi driver 이해하기
- Authors
- Name
- Jay


aws ebs csi driver
Kubernetes에서 csi driver는 크게 deployment나 statefulset으로 관리되는 controller plugin과 daemonset으로 관리되는 node plugin으로 구성되어 있다. Kubernetes의 design proposals 문서에 아래와 같은 다이아그램 이미지로 잘 설명하고 있다.
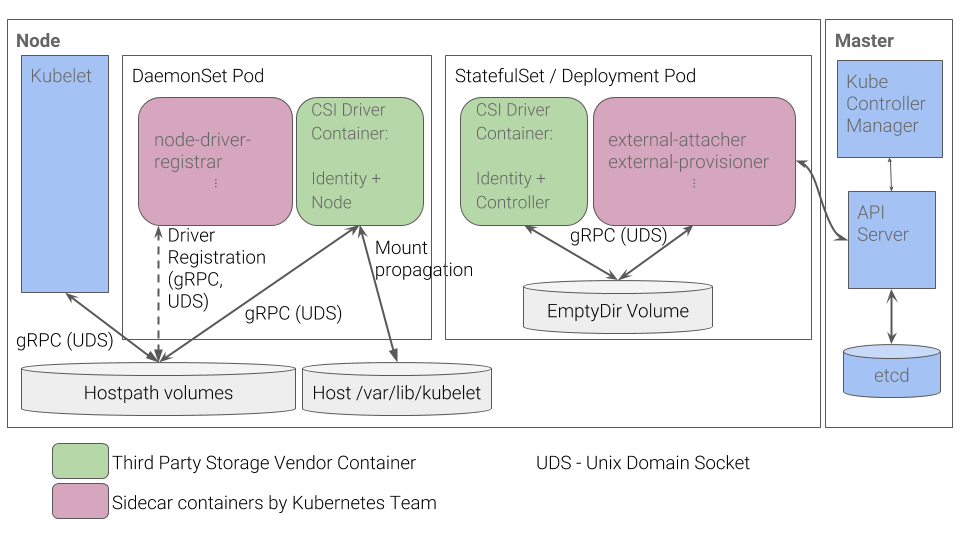
controller라는 이름에서 알 수 있듯이 controller plugin은 API server의 object 변경에 따라서 작업을 해주고, Node plugin은 Node의 kubelet이 csi driver를 통해서 작업을 할 수 있도록 Daemonset으로 Node마다 존재한다.
controller plugin
aws-ebs-csi-driver의 k8s manifest를 보면 Deployment kind로 정의되어 있는 것을 볼 수 있다.
kind: Deployment
apiVersion: apps/v1
metadata:
  name: ebs-csi-controller
  labels:
    app.kubernetes.io/name: aws-ebs-csi-driver
spec:
  replicas: 2
그리고 아래처럼 6가지의 container들이 정의되어 있는 것도 확인할 수 있다.
- ebs-plugin
- csi-provisioner
- csi-attacher
- csi-snapshotter
- csi-resizer
- liveness-probe
ebs-plugin
이제 cloud vendor별의 interface가 csi driver에 들어가게 되고, ebs-plugin이 그 부분이다. aws-ebs-csi-driver의 controller.go 소스 코드를 보면 아래와 같은 method들이 보인다.
- CreateVolume
- DeleteVolume
- ControllerPublishVolume
- ControllerUnpublishVolume
- ControllerExpandVolume
- CreateSnapshot
- DeleteSnapshot
aws-ebs-csi-driver의 driver.go 소스 코드를 보면 아래처럼 ControllerMode로 설정이 되었을 때 위의 ControllerService의 instance를 만드는 것을 볼 수가 있다. AllMode일 때는 아래처럼 controllerService와 nodeService 모두 instance를 만들어서 설정하게 된다.
switch driverOptions.mode {
	case ControllerMode:
		driver.controllerService = newControllerService(&driverOptions)
	case NodeMode:
		driver.nodeService = newNodeService(&driverOptions)
	case AllMode:
		driver.controllerService = newControllerService(&driverOptions)
		driver.nodeService = newNodeService(&driverOptions)
	default:
		return nil, fmt.Errorf("unknown mode: %s", driverOptions.mode)
	}
그래서 aws-ebs-csi-driver의 controller.yaml을 보면 인자로 driver의 mode를 설정할 수 있다. 기본값이 AllMode이고 controller plugin과 node plugin에서 따로 인자를 설정하지 않고 공용으로 쓰고 있다.
containers:
  - name: ebs-plugin
    image: public.ecr.aws/ebs-csi-driver/aws-ebs-csi-driver:v1.24.0
    imagePullPolicy: IfNotPresent
    args:
      # - {all,controller,node} # specify the driver mode
      - --endpoint=$(CSI_ENDPOINT)
      - --logging-format=text
      - --user-agent-extra=kustomize
      - --v=2
이제 위의 다이아그램 이미지에서 잘 설명한 것처럼, Node plugin은 node에 있는 kubelet과 연결하기 위해서 hostPath를 사용한다. 하지만 controller plugin은 csi-provisioner, csi-attacher, csi-snapshotter, csi-resizer, liveness-probe들이 연결되고 이들이 API server와 통신하기 때문에 emptyDir로 설정된다.
volumeMounts:
  - name: socket-dir
    mountPath: /var/lib/csi/sockets/pluginproxy/

volumes:
  - name: socket-dir
    emptyDir: {}
csi-provisioner
The external-provisioner is a sidecar container that dynamically provisions volumes by calling
CreateVolumeandDeleteVolumefunctions of CSI drivers.
external-provisioner 소스코드 controller.go를 보면 아래처럼 csi driver를 통해서 CreateVolume과 DeleteVolume을 호출하는 것을 확일 할 수 있다.
rep, err := p.csiClient.CreateVolume(createCtx, req)
_, err = p.csiClient.DeleteVolume(deleteCtx, &req)
csi-attacher
The CSI external-attacher is a sidecar container that watches the Kubernetes API server for VolumeAttachment objects and triggers Controller[Publish|Unpublish]Volume operations against a CSI endpoint. from doc
external-attacher 소스코드 attacher.go를 보면 아래처럼 csi driver를 통해서 ControllerPublishVolume, ControllerUnpublishVolume 를 호출하는 것을 확인 할 수 있다.
func (a *attacher) Attach(ctx context.Context, volumeID string, readOnly bool, nodeID string, caps *csi.VolumeCapability, context, secrets map[string]string) (metadata map[string]string, detached bool, err error) {
	req := csi.ControllerPublishVolumeRequest{
		VolumeId:         volumeID,
		NodeId:           nodeID,
		VolumeCapability: caps,
		Readonly:         readOnly,
		VolumeContext:    context,
		Secrets:          secrets,
	}

	rsp, err := a.client.ControllerPublishVolume(ctx, &req)
	if err != nil {
		return nil, isFinalError(err), err
	}
	return rsp.PublishContext, false, nil
}
func (a *attacher) Detach(ctx context.Context, volumeID string, nodeID string, secrets map[string]string) error {
	req := csi.ControllerUnpublishVolumeRequest{
		VolumeId: volumeID,
		NodeId:   nodeID,
		Secrets:  secrets,
	}

	_, err := a.client.ControllerUnpublishVolume(ctx, &req)
	return err
}
external-attacher 소스코드 controller.go를 보면 아래처럼 Informer에 VolumeAttachment object가 Add, Update, Delete할 때 수행될 로직을 추가하였다.
volumeAttachmentInformer.Informer().AddEventHandler(cache.ResourceEventHandlerFuncs{
  AddFunc:    ctrl.vaAdded,
  UpdateFunc: ctrl.vaUpdated,
  DeleteFunc: ctrl.vaDeleted,
})

pvInformer.Informer().AddEventHandler(cache.ResourceEventHandlerFuncs{
  AddFunc:    ctrl.pvAdded,
  UpdateFunc: ctrl.pvUpdated,
  //DeleteFunc: ctrl.pvDeleted, TODO: do we need this?
})
external-attacher 소스코드 cis_handler.go에서 최종적으로 VolumeAttachment에 DeletetionTimestamp 값이 있으면 Detach를 호출하게 되고, 없으면 Attach를 호출하게 된다.
func (h *csiHandler) SyncNewOrUpdatedVolumeAttachment(va *storage.VolumeAttachment) {
	klog.V(4).Infof("CSIHandler: processing VA %q", va.Name)

	var err error
	if va.DeletionTimestamp == nil {
		err = h.syncAttach(va)
	} else {
		err = h.syncDetach(va)
	}
	if err != nil {
		// Re-queue with exponential backoff
		klog.V(2).Infof("Error processing %q: %s", va.Name, err)
		h.vaQueue.AddRateLimited(va.Name)
		return
	}
	// The operation has finished successfully, reset exponential backoff
	h.vaQueue.Forget(va.Name)
	klog.V(4).Infof("CSIHandler: finished processing %q", va.Name)
}
func (h *csiHandler) syncAttach(va *storage.VolumeAttachment) error {
  ...생략
  va, metadata, err := h.csiAttach(va)
  ...생략
}
func (h *csiHandler) syncDetach(va *storage.VolumeAttachment) error {
  ...생략
  va, err := h.csiDetach(va)
  ...생략
}
csi-snapshotter
rsp, err := client.CreateSnapshot(ctx, &req)
if _, err := client.DeleteSnapshot(ctx, &req); err != nil {
  return err
}
snapshot_controller_base.go에서 마찬가지로 VolumeSnapshot Object가 Add, Update, Delete가 되면 CreateSnapshot과 DeleteSnapshot이 실행된다.
volumeSnapshotContentInformer.Informer().AddEventHandlerWithResyncPeriod(
  cache.ResourceEventHandlerFuncs{
    AddFunc: func(obj interface{}) { ctrl.enqueueContentWork(obj) },
    UpdateFunc: func(oldObj, newObj interface{}) {
      // Considering the object is modified more than once during the workflow we are not relying on the
      // "AnnVolumeSnapshotBeingCreated" annotation. Instead we will just check if newobj status has error
      // and avoid the immediate re-queue. This allows the retry to happen with exponential backoff.
      newSnapContent := newObj.(*crdv1.VolumeSnapshotContent)
      if newSnapContent.Status != nil && newSnapContent.Status.Error != nil {
        return
      }
      ctrl.enqueueContentWork(newObj)
    },
    DeleteFunc: func(obj interface{}) { ctrl.enqueueContentWork(obj) },
  },
  ctrl.resyncPeriod,
)
external-resizer
client.go에서 ControllerExpandVolume이 호출되는 걸 확인할 수 있다.
func (c *client) Expand(
	ctx context.Context,
	volumeID string,
	requestBytes int64,
	secrets map[string]string,
	capability *csi.VolumeCapability) (int64, bool, error) {
	req := &csi.ControllerExpandVolumeRequest{
		Secrets:          secrets,
		VolumeId:         volumeID,
		CapacityRange:    &csi.CapacityRange{RequiredBytes: requestBytes},
		VolumeCapability: capability,
	}
	resp, err := c.ctrlClient.ControllerExpandVolume(ctx, req)
	if err != nil {
		return 0, false, err
	}
	return resp.CapacityBytes, resp.NodeExpansionRequired, nil
}
마찬가지로 Informer에 addEventHandler로 Add, Update, Delete 될 때 로직을 추가하였고, 결국은 Workqueue에 들어간 PVC 정보로 필요시에는 위의 Expand 메소드를 호출하게 된다.
pvcInformer.Informer().AddEventHandlerWithResyncPeriod(cache.ResourceEventHandlerFuncs{
  AddFunc:    ctrl.addPVC,
  UpdateFunc: ctrl.updatePVC,
  DeleteFunc: ctrl.deletePVC,
}, resyncPeriod)
election
그리고 controller의 deployment k8s manifest를 보면 replica가 2로 되어 있다.
kind: Deployment
apiVersion: apps/v1
metadata:
  name: ebs-csi-controller
  labels:
    app.kubernetes.io/name: aws-ebs-csi-driver
spec:
  replicas: 2
그래서 lead election을 통해서 하나의 pod만 active하게 각 container의 option(--leader-election=true)으로 정의하고 있다.
- name: csi-provisioner
  image: public.ecr.aws/eks-distro/kubernetes-csi/external-provisioner:v3.5.0-eks-1-28-6
  imagePullPolicy: IfNotPresent
  args:
    - --csi-address=$(ADDRESS)
    - --v=2
    - --feature-gates=Topology=true
    - --extra-create-metadata
    - --leader-election=true
    - --default-fstype=ext4
node plugin
aws-ebs-csi-driver의 node.go에서는
- NodePublishVolume
- NodeUnpublishVolume
- NodeStageVolume
- NodeUnstageVolume
NodePublishVolume과 NodeStageVolume이 어떤 일을 하는지 Github issue에 설명이 되어 있다.
ControllerPublishVolume is used to attach disk to a node. NodeStageVolume is used to partition and format the disk and mount the disk on a node global directory. NodePublishVolume is used to bind mount the global directory on a container directory.
결국은 pod가 생성되어서 kubelet이 Node host나 container에 mount를 할때 사용되는 것으로 보인다.
node-driver-registrar
The CSI node-driver-registrar is a sidecar container that fetches driver information (using NodeGetInfo) from a CSI endpoint and registers it with the kubelet on that node using the kubelet plugin registration mechanism.
결론
Storage Class에 연결된 PVC object를 생성하면, PV가 자동으로 생성되게 된다. 이 문서에 따르면 external-provisioner가 CSI driver로 volume을 생성하고 PV object를 생성한다고 한다. 🤔 그런데 external-provisioner 소스코드를 보면 PV를 k8s client로 생성하는 것을 찾을 수가 없다. 이부분은 어떤 코드를 봐야 하는 걸까?
이제 PVC와 PV가 생성되고 나고, VolumeAttachment object가 생성되면 해당 volume이 특정 node에 attach가 된다. external-attacher sidecar container가 VolumeAttachment object를 monitoring하다가 CSI driver로 attach를 한다. 🤔 그런데 PVC와 PV가 생성되고, pod에 persistentVolumeClaim으로 PVC를 설정하면 VolumeAttachment object가 자동으로 생성된다. pod가 생성될 때 pod가 띄는 Node에 attach될 수 있도록 persistentVolumeClaim이 생기는데 어디서 생기는거지?
PVC의 size를 변경하면 external-resizer sidecar container가 Volume을 업데이트 하게 되고, VolumeSnapshot object를 생성하면 external-snapshotter sidecar container CSI driver로 snapshot을 생성하게 된다.
마지막으로 kubelet이 volume을 Node host나 container의 directory에 mount할 수 있도록 CSI driver를 연결해주는 node-driver-registrar가 있다. 이렇게 각 sidecar container가 역할을 맞아서 CSI driver로 Volume을 생성하고 attach/mount를 할 수 있게 된다.
NCloud에서
static PV provisioning
네이버 클라우드 콘솔에서 Storage를 하나 생성한다. 그리고 아래와 같이 StroageClass를 정의한다.
kind: StorageClass
apiVersion: storage.k8s.io/v1
metadata:
  name: my-nks-block-storage
  namespace: kube-system
  annotations:
    storageclass.kubernetes.io/is-default-class: 'true'
provisioner: blk.csi.ncloud.com
volumeBindingMode: Immediate
reclaimPolicy: Retain
allowVolumeExpansion: true
parameters:
  type: SSD
그다음에 생성된 storage를 통해서 PV를 정의한다.
kind: PersistentVolume
apiVersion: v1
metadata:
  name: volume-existing-01
  annotations:
    pv.kubernetes.io/provisioned-by: blk.csi.ncloud.com # 블록 스토리지와 연동될 provisoner 이름
spec:
  storageClassName: my-nks-block-storage # 블록 스토리지의 스토리지 클래스 이름
  persistentVolumeReclaimPolicy: Retain
  capacity:
    storage: 10Gi # 블록 스토리지 크기
  accessModes:
    - ReadWriteOnce
  csi:
    driver: blk.csi.ncloud.com
    fsType: ext4
    volumeHandle: '999999' # Block Storage Instance ID
    volumeAttributes:
      blk.csi.ncloud.com/noformat: 'true' # 블록스토리지를 포맷하지 않음
그리고 PVC object를 생성한다.
apiVersion: v1
kind: PersistentVolumeClaim
metadata:
  name: csi-pod-pvc
spec:
  accessModes:
    - ReadWriteOnce
  resources:
    requests:
      storage: 10Gi
  storageClassName: my-nks-block-storage
네이버 클라우드의 storage 정보를 보면, 아래와 같이 연결정보가 없는 것을 확인 할 수 있다.

마지막으로 VolumeAttachment object를 생성해주면 연결정보가 nodeName로 연결된 것을 확인 할 수 있다.
apiVersion: storage.k8s.io/v1
kind: VolumeAttachment
metadata:
  name: test
spec:
  attacher: blk.csi.ncloud.com
  nodeName: node-01
  source:
    persistentVolumeName: volume-existing-01
dynamic provisioning
StorageClass의 volumeBindingMode를 Immediate로 설정한다.
kind: StorageClass
apiVersion: storage.k8s.io/v1
metadata:
  name: my-nks-block-storage
  namespace: kube-system
  annotations:
    storageclass.kubernetes.io/is-default-class: 'true'
provisioner: blk.csi.ncloud.com
volumeBindingMode: Immediate
reclaimPolicy: Retain
allowVolumeExpansion: true
parameters:
  type: SSD
그리고 PVC object를 생성하면 dynamic하게 PV가 생성되고, 네이버 클라우드에 storage가 생성된다.
apiVersion: v1
kind: PersistentVolumeClaim
metadata:
  name: csi-pod-pvc
spec:
  accessModes:
    - ReadWriteOnce
  resources:
    requests:
      storage: 10Gi
  storageClassName: my-nks-block-storage
🤔 그런데 VolumeAttachment object가 없는데도, storage 연결정보에서 node가 연결되어 있다. 이것이 의도한 결과인가? (네이버 클라우드에서 Block storage를 생성할 때 서버에 부착이 되어야 하는 상황이라 Immediate로 PV가 생성될 때 자동으로 Node에 부착된다. 하지만 Pod에 PVC로 연결하면 이제 해당 Pod가 돌고 있는 노드로 다시 재부착이 된다.)
문서에 아래처럼 설명되어 있다.
The Immediate mode indicates that volume binding and dynamic provisioning occurs once the PersistentVolumeClaim is created.
아래처럼 volumeBindingMode를 WaitForFirstConsumer로 설정하면, pod가 PVC를 사용할 때까지 Pending 상태가 있다가 사용하면 pod의 Node에 붙게 된다. PV와 VolumeAttachment object가 같이 생기게 된다.
kind: StorageClass
apiVersion: storage.k8s.io/v1
metadata:
  name: my-nks-block-storage
  namespace: kube-system
  annotations:
    storageclass.kubernetes.io/is-default-class: 'true'
provisioner: blk.csi.ncloud.com
volumeBindingMode: WaitForFirstConsumer
reclaimPolicy: Retain
allowVolumeExpansion: true
parameters:
  type: SSD
snapshot
StorageClass와 마찬가지로 VolumeSnapshotClass도 default로 하나 만들어져 있다. 따라서 아래처럼 object를 생성하면 snapshot이 만들어진다.
apiVersion: snapshot.storage.k8s.io/v1beta1
kind: VolumeSnapshot
metadata:
  name: new-snapshot-test
spec:
  volumeSnapshotClassName: nks-block-storage
  source:
    persistentVolumeClaimName: pvc-name
snapshot을 주기적으로 하고, 최신 몇개만 유지하고 싶은데 보니깐 여러 사람들이 Custom Controller로 만든 것들이 보인다. Custom Controller를 직접 만들어 보는 것도 재미있겠다. 😋